Lab 4: Implement the Salesforce System API
Overview
In this lab, we will create the implementation of our Salesforce System API that will process requests to Salesforce.
We will learn how to scaffold our REST API with APIkit and connect our API to Salesforce. Then, we will set up a data transformation using DataWeave to transform data from Salesforce and return it in a JSON object when our API endpoint is hit.
To build our first integration, we will use MuleSoft’s Anypoint Studio which enables developers to create integrations by simply dragging and dropping different connectors onto the canvas.
Step 0: In case you did not complete the previous lab
If you have not created the Database System API from the previous lab, you can download it from Database System API Example, or simply reuse the "Example Database API" in Anypoint Exchange.
Note: If you choose to use the pre-existing Example Database API, please remember to import it into you Design Center, and publish it.
Step 1: Clone the RAML to create Salesforce System API
We will now clone the Existing Database API to create our Salesforce System API.
-
Navigate to Design Center in https://anypoint.mulesoft.com
-
Find the Database System API, and click on it to start editing it.
-
Navigate to the Duplicate option as shown in the screenshot
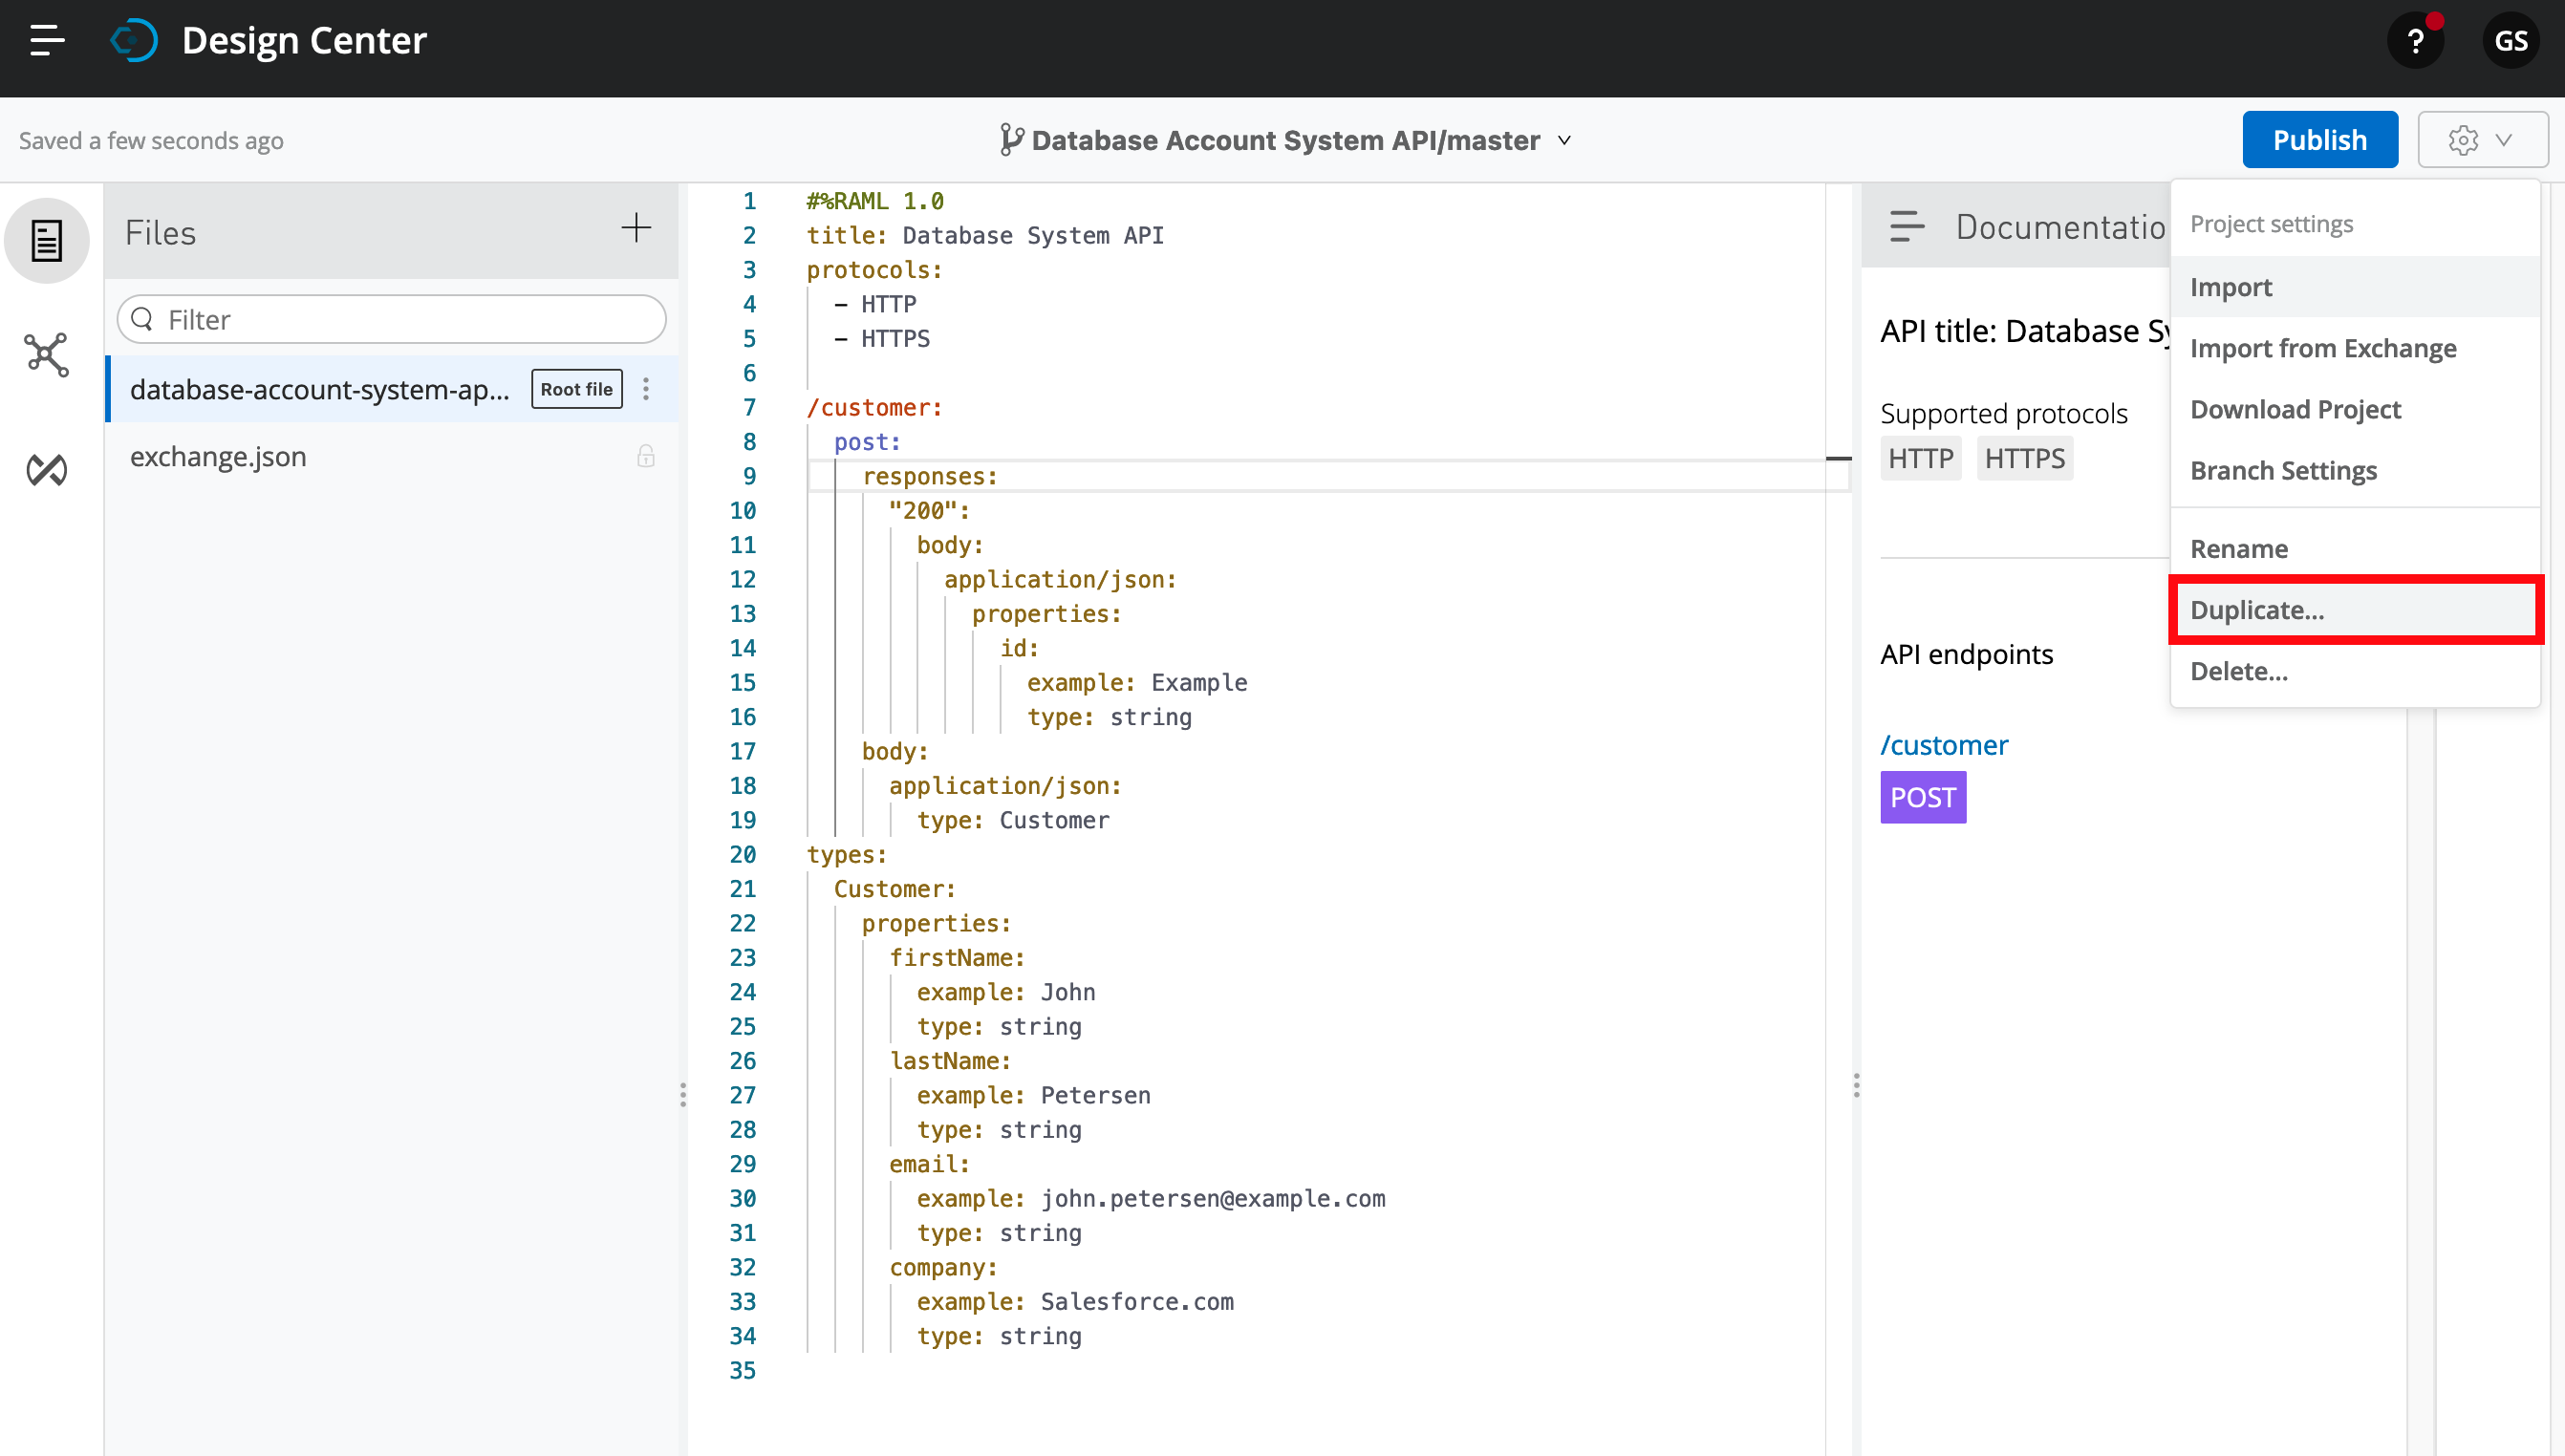
-
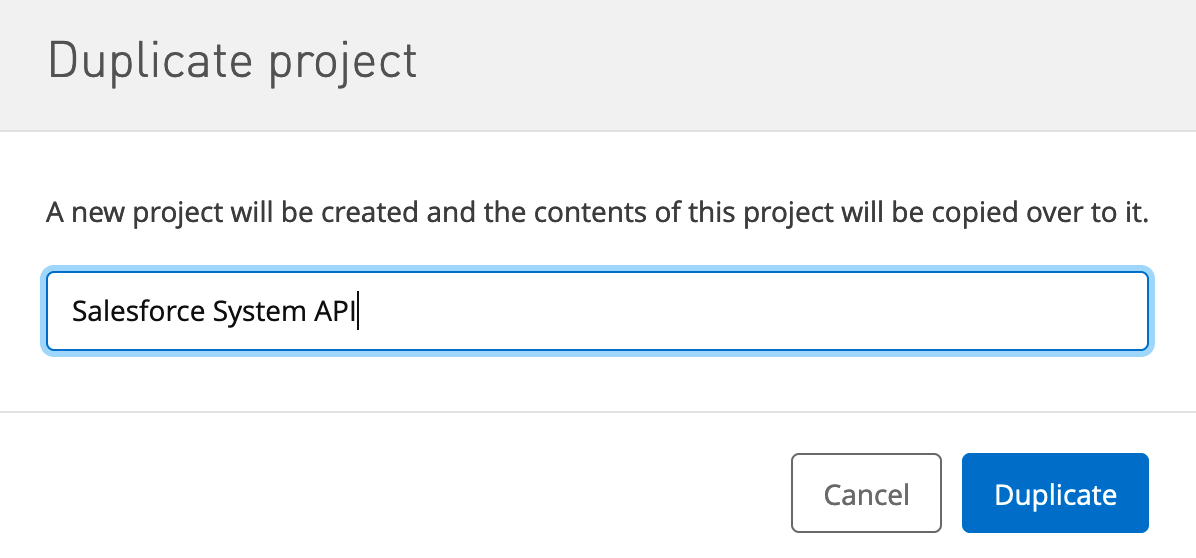
Give your new RAML the name Salesforce System API
-
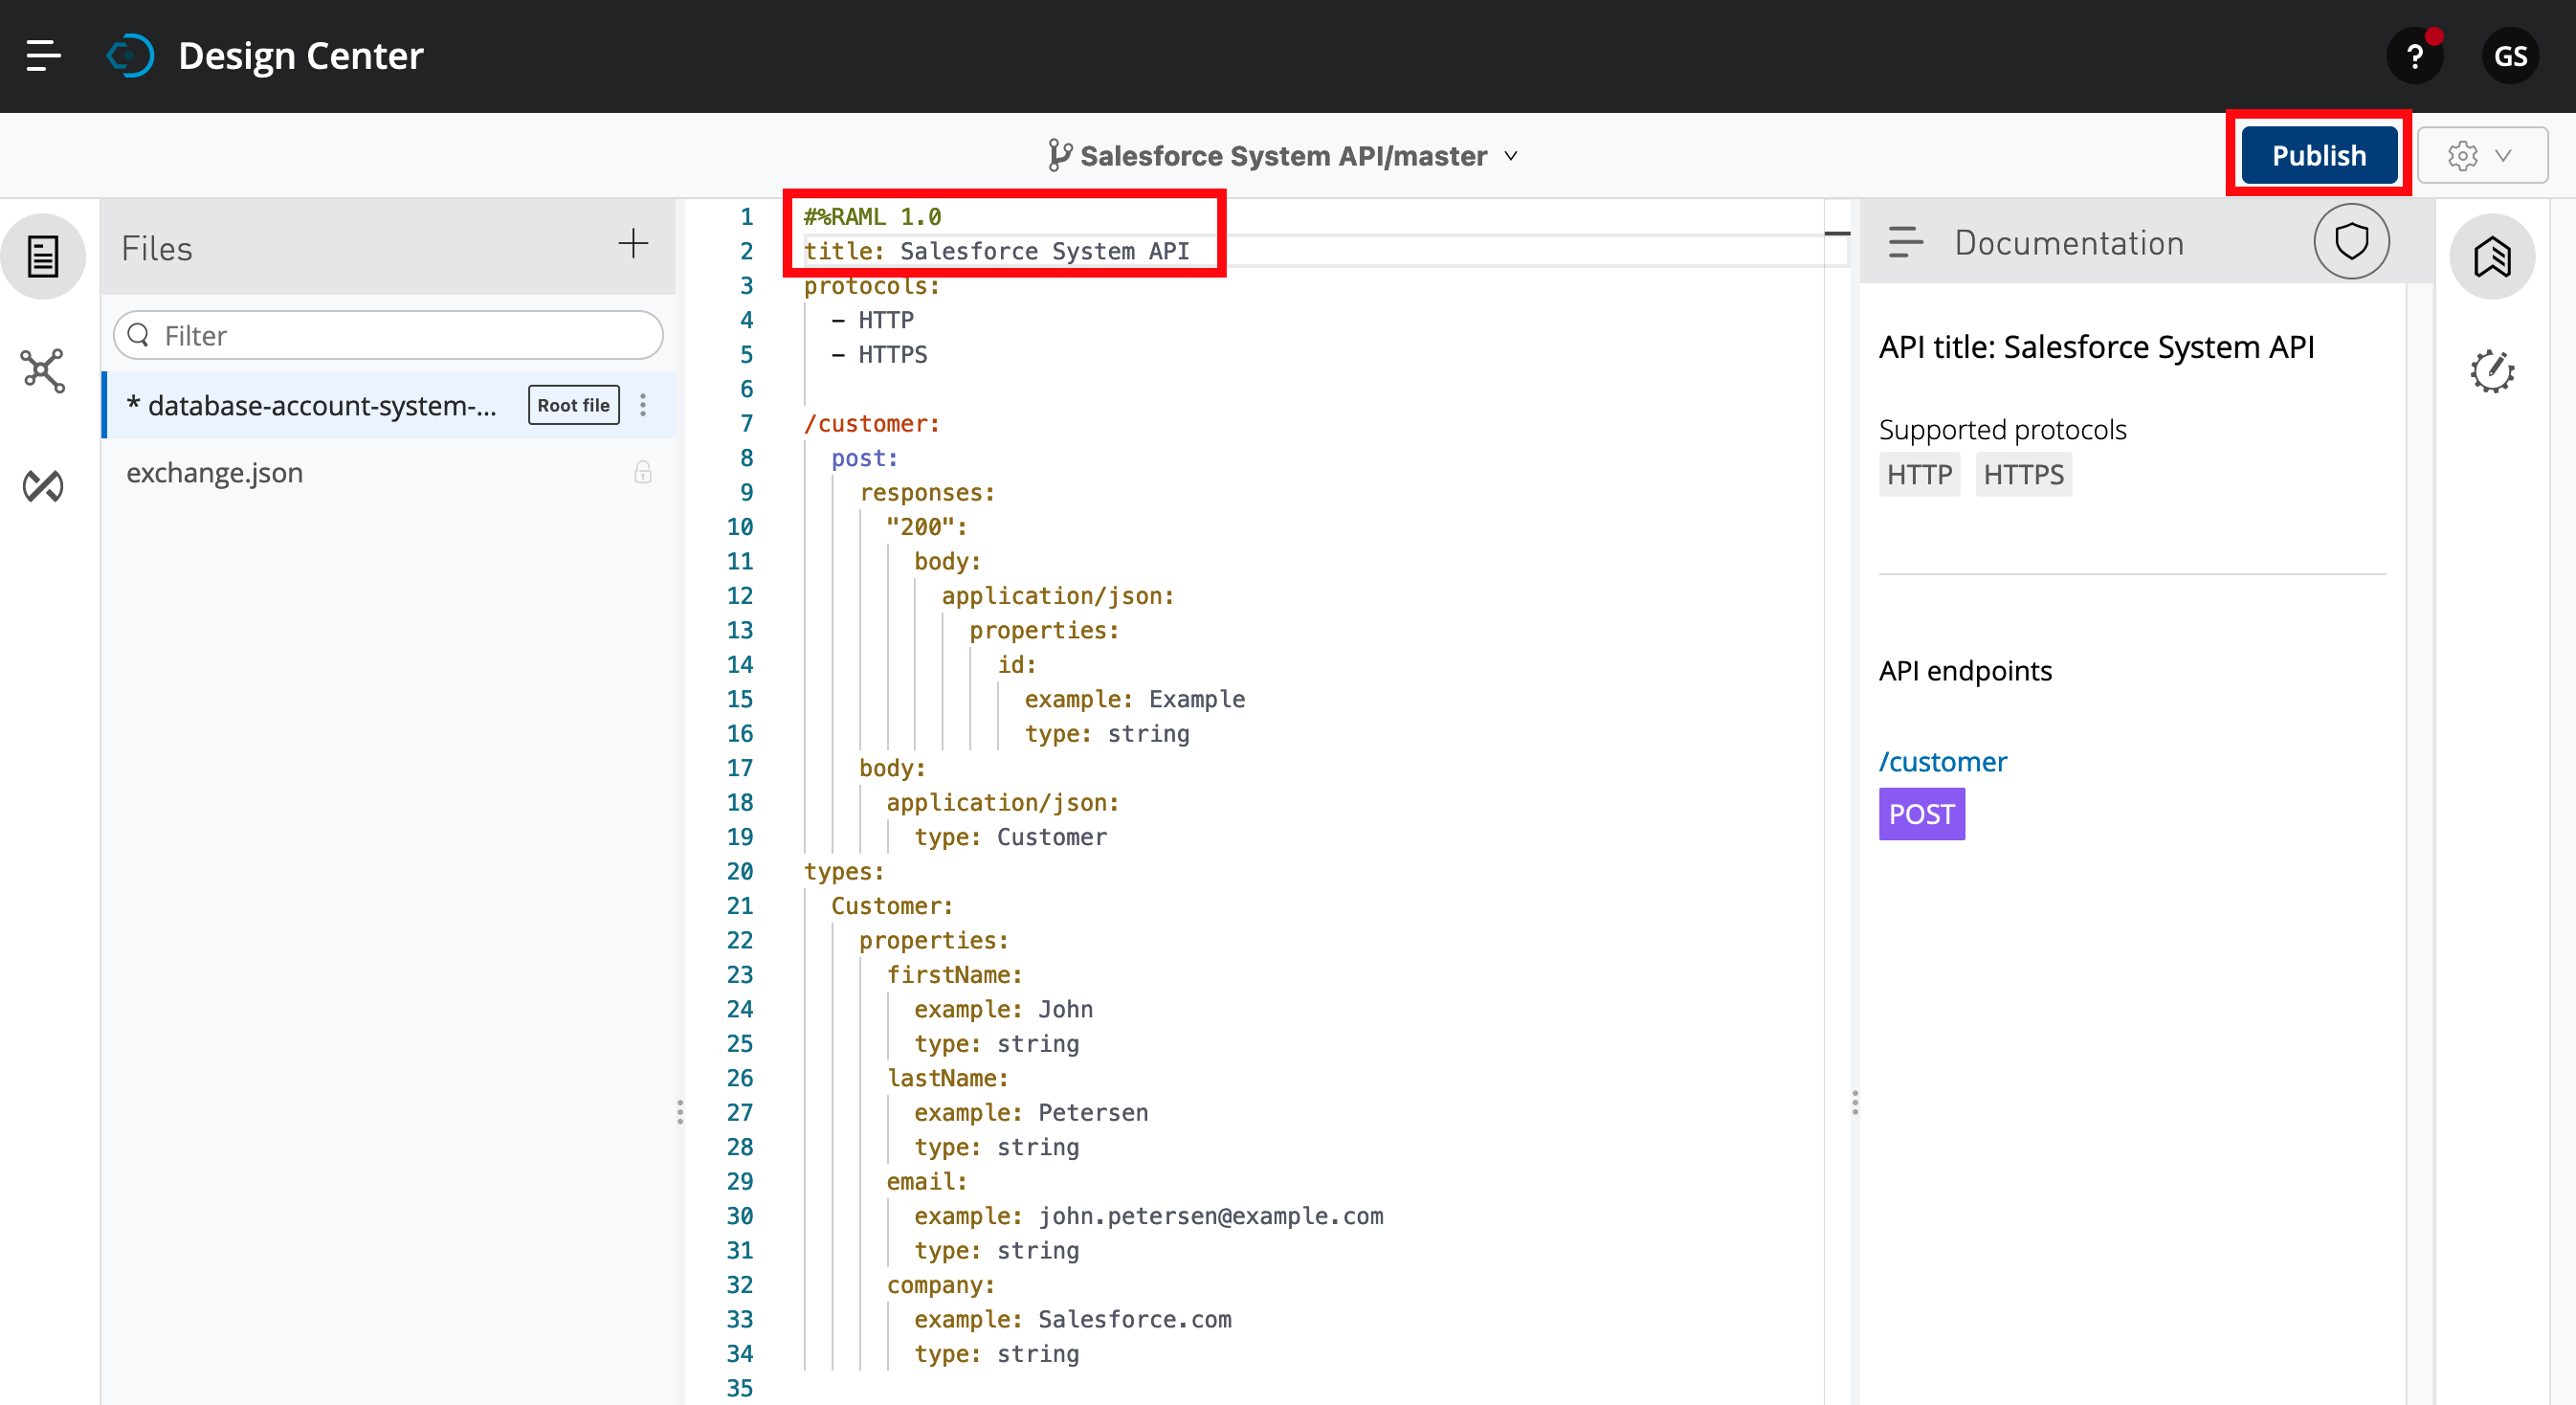
Rename the title in the RAML, and publish it to Exchange
Step 2: Create a new Mule Project from the RAML
In this step we will create a new Mule application in Anypoint Studio from the Database System API RAML definition. This will be the implementation of our REST API.
Step 2.1: If this is your first Anypoint Studio project
-
Start Anypoint Studio from the desktop icon.
-
In the Workspace Launcher, use the default workspace directory location.
-
In the pop-up window click on Continue to Studio
-
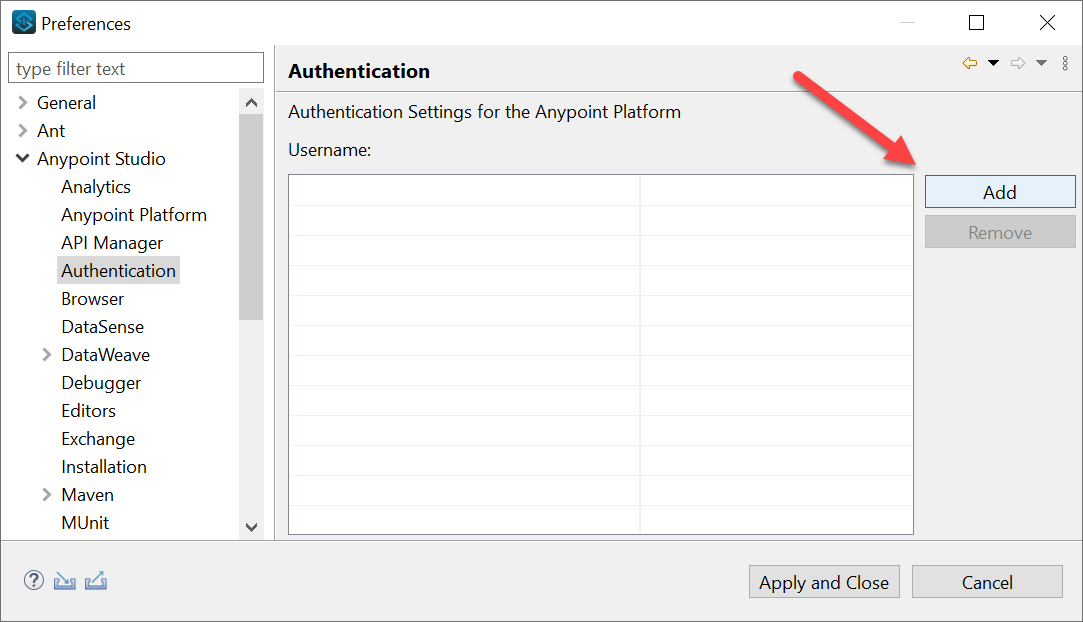
You are now inside Anypoint Studio. First, let’s sync your Anypoint Platform account with Anypoint Studio. Go to Window → Preferences (for windows) or Anypoint Studio → Preference (for Mac) to open the Anypoint Studio Preferences.
-
Then go to Anypoint Studio → Authentication. If you see your account name there, skip to step 7. If not, click the Add button.
-
Login to your Anypoint Platform workshop account. Then click Apply and Close.

Step 2.2: Create a new project
-
Open the Menu File → New → Mule Project
-
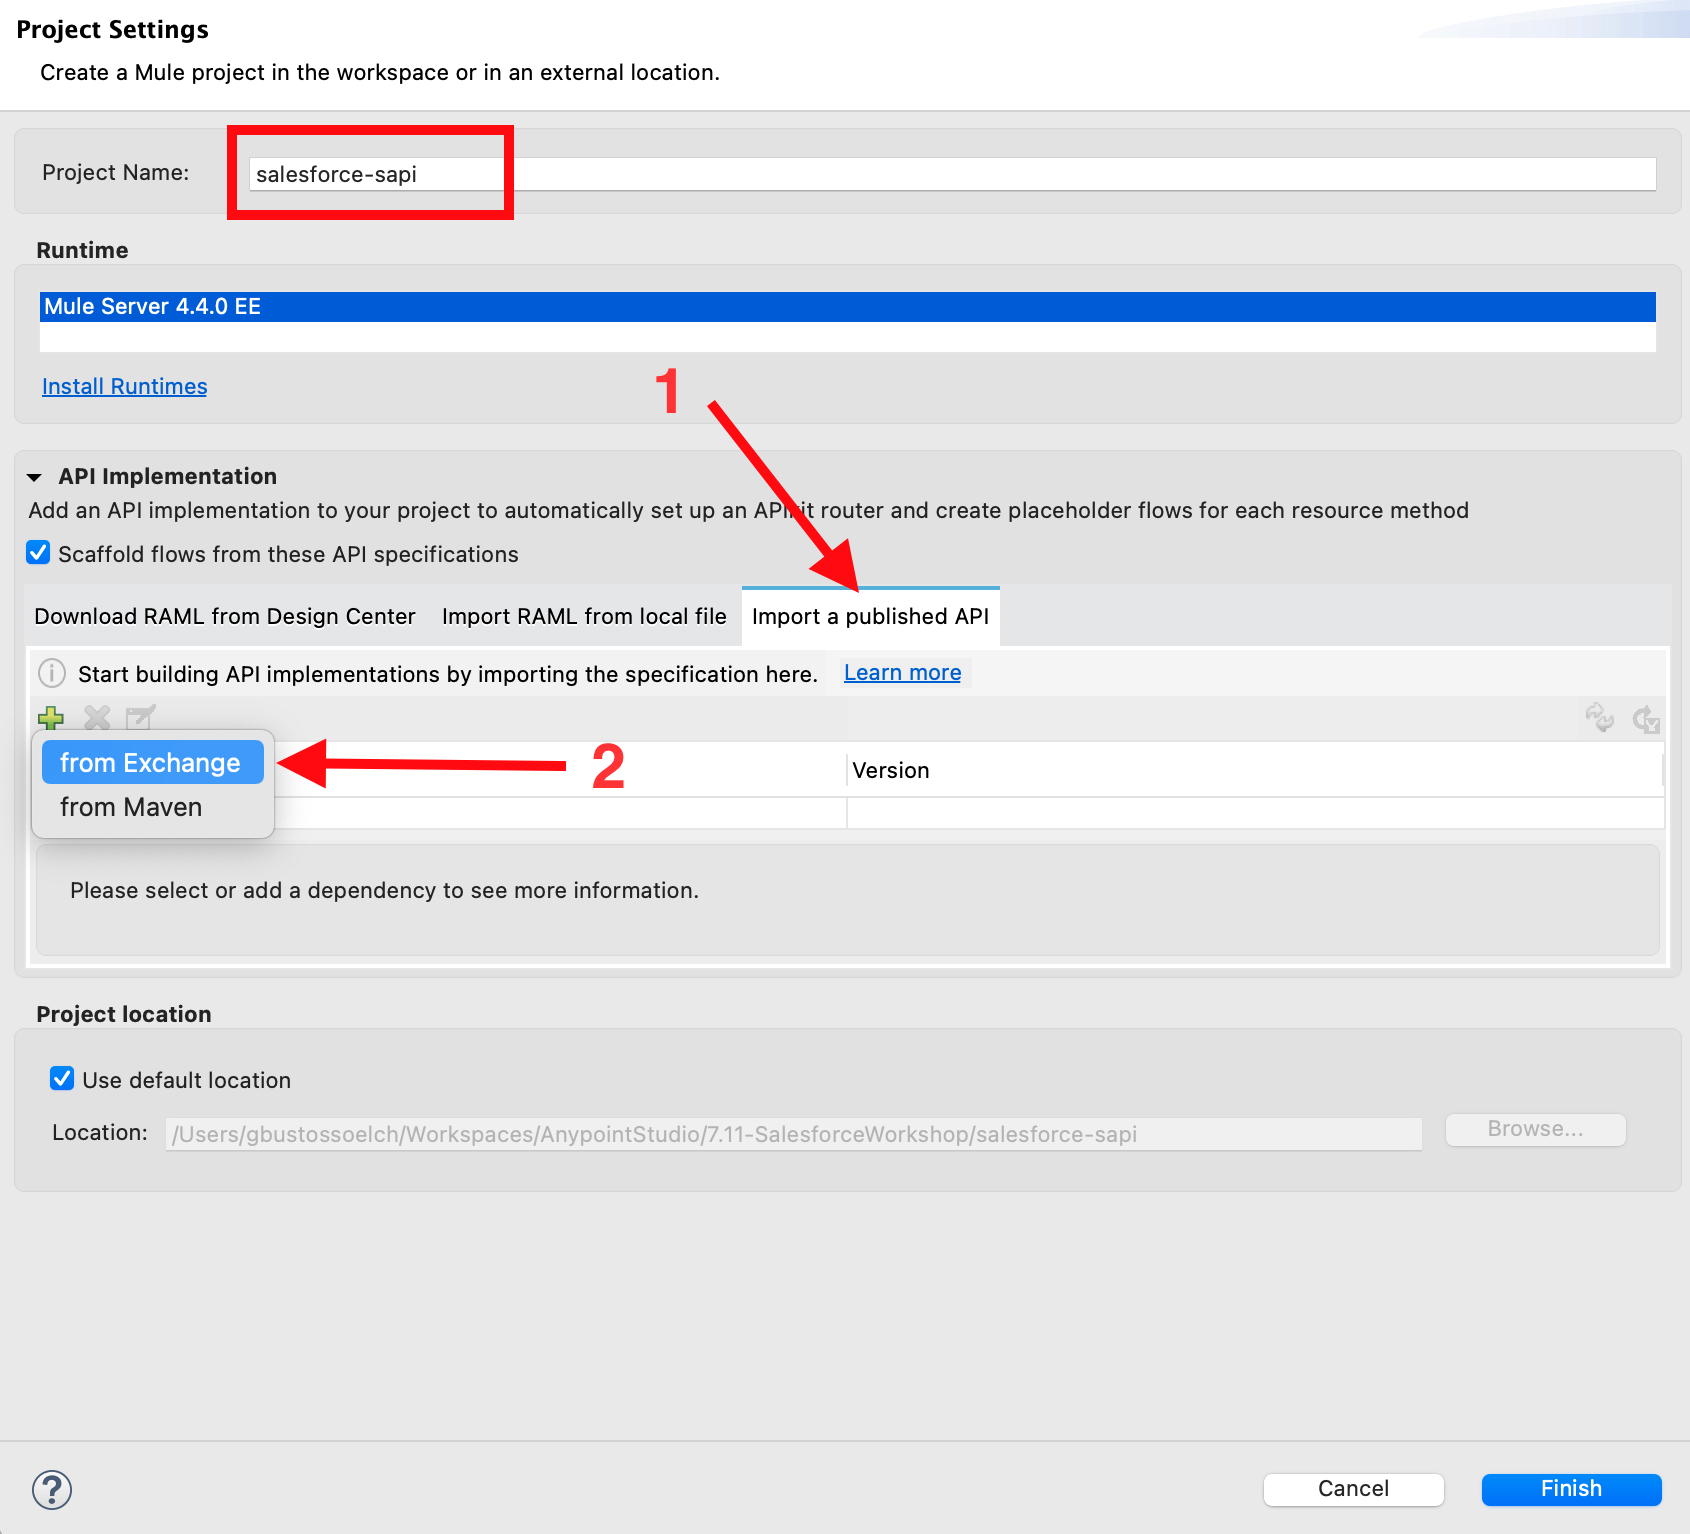
Set the project name to salesforce-sapi.
-
Under the API Implementation settings, in the Import a published API tab, click on the green cross and select from Exchange
-
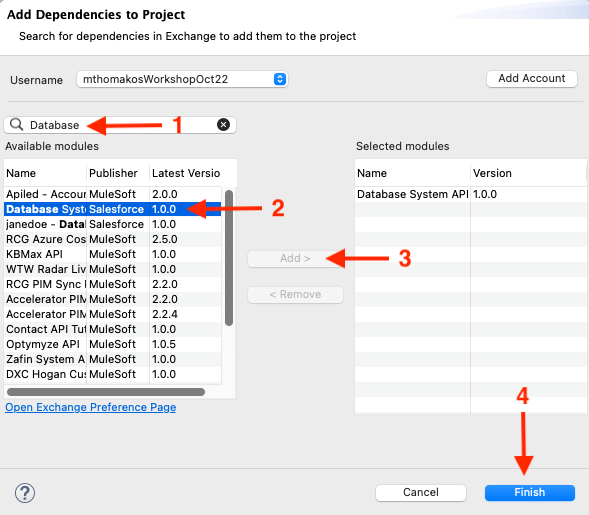
In the Add Dependencies box:
-
Search for the Database System API that you created in the last lab.
-
Once found, click on the API name.
-
Click the Add button to add the module dependancy to the project.
-
Then click on Finish.
-
-
Once you are back on the New Mule project window, you can click Finish. This will create a skeleton project that implements your API.
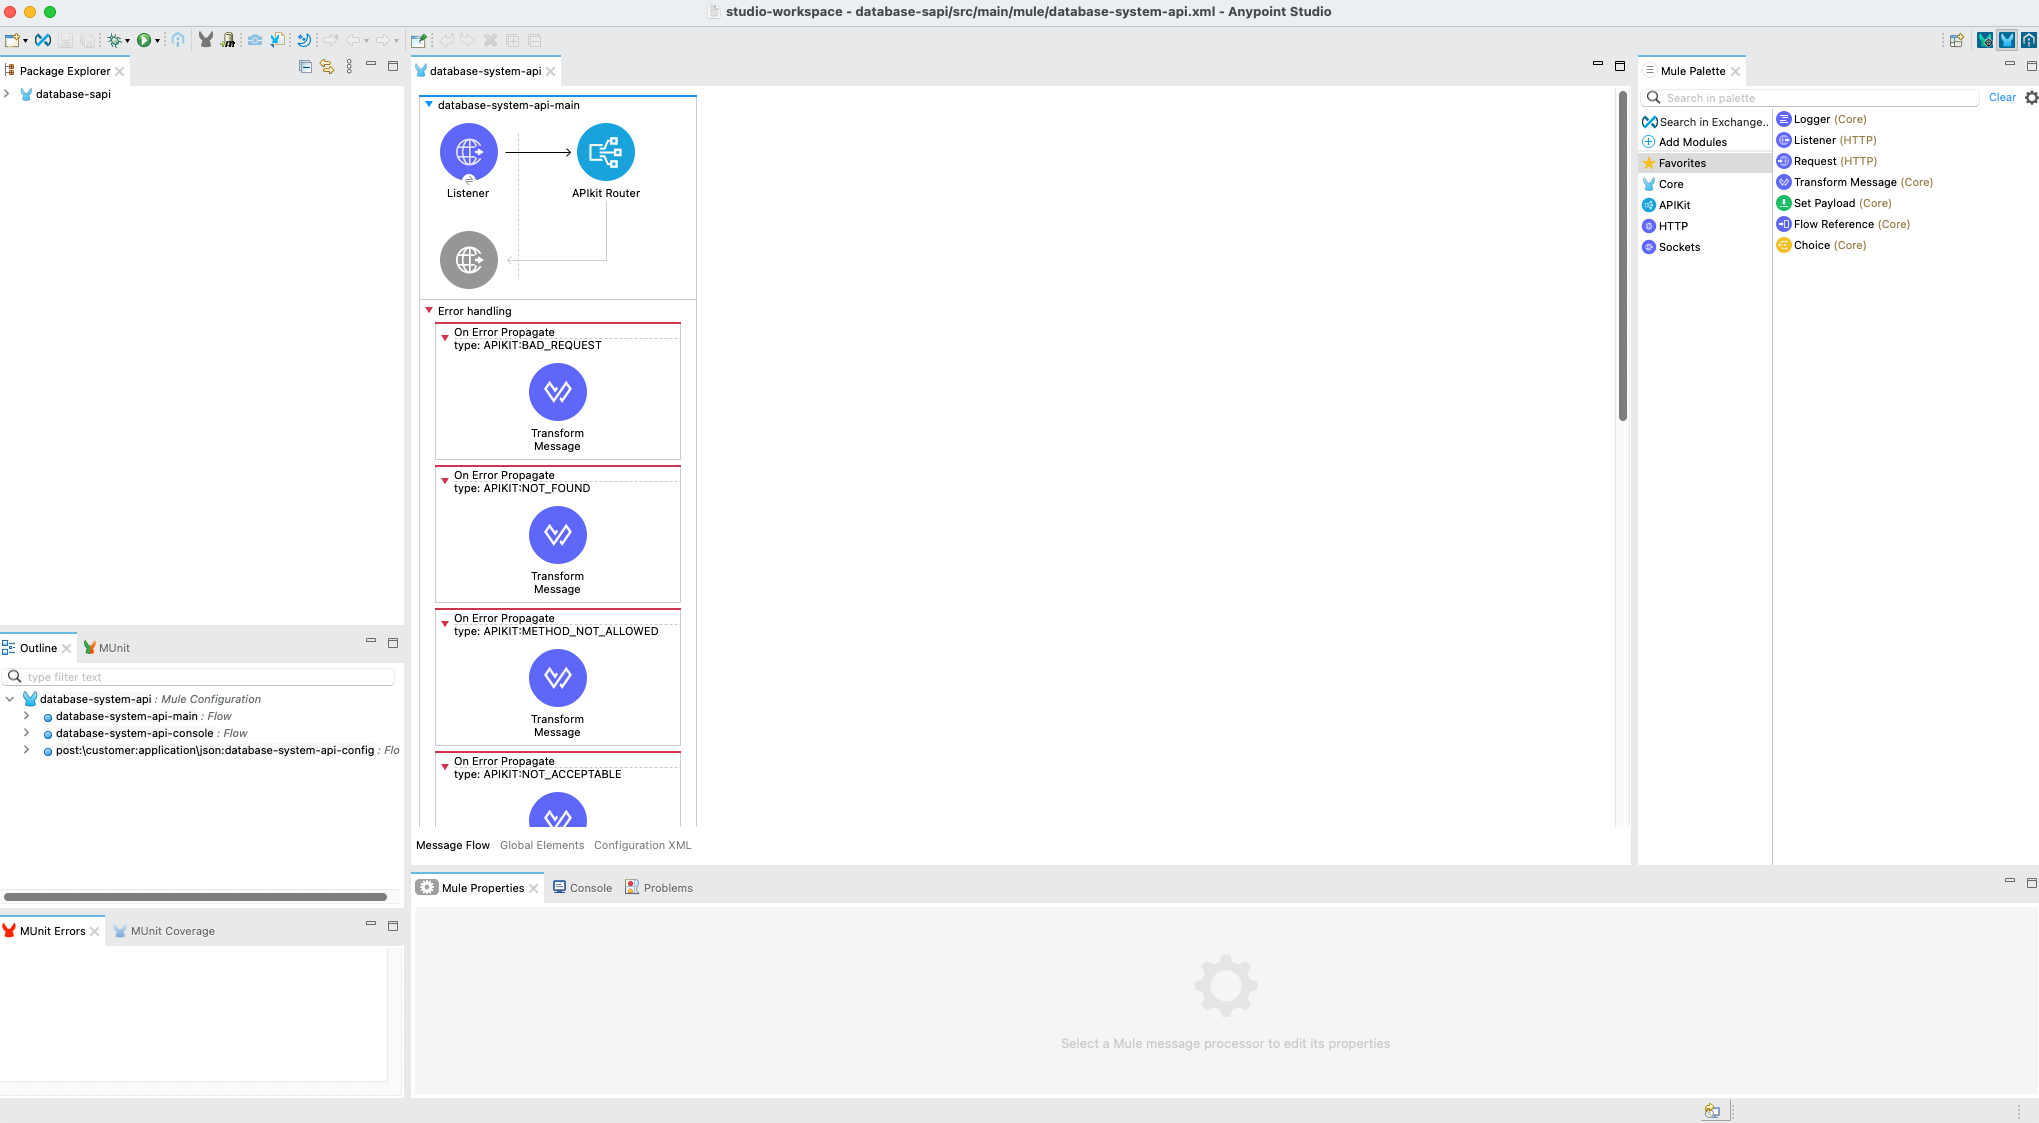
When you import your API Specification from Exchange into Anypoint Studio, APIkit will automatically create API scaffolding based on the API Specification we created in Design Center. As you can see, APIkit has split our project into a number of different flows.
Additionally, APIkit automatically generates error handlers which will return a message to the API consumer if they send an invalid HTTP request to the /contacts endpoint.
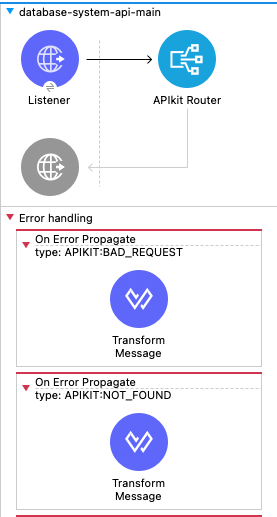
At the top of the diagram you will see a flow called api-main and api-console followed by a number of additional flows, one for each method defined in the RAML.
The flows below are defined by your API Design in the RAML file. Typically, there will be flows that look like this get:\resource, post:\resource, put:\resource, etc. Note that the name of the flow is very important for the APIkit router to be able to route the request to the appropriate flow - you don’t want to change these.
The following table describes all of the flows in our project:
|
api-main This is the main flow. It exposes an HTTP service and processes the requests using the APIKit Router. The HTTP request will be converted to a mule message, and redirected to the requested flow by the APIKit router. By selecting the http listener one can take a look at the HTTP configuration, you will see that its listening for requests on http://localhost:8081/api. Inside the api-main flow also an Error-Handling block is included. In this block multiple On Error Propagate definitions are autogenerated for common API error responses such as METHOD_NOT_ALLOWED, BAD_REQUEST etc. |
|
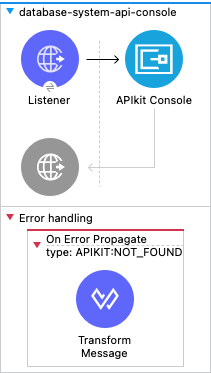
api-console This flow creates an APIKit console when the mule application is run which can be used to easily test your application. We’ll see this in action shortly. |
|
post:\customer This flow creates customers |
Step 3: Build the Post Customer Flow
Now that we understand our newly created mule project and scaffolded flows in a bit more detail, we are now going to build out our first flow, which will write a customer record to Salesforce.
-
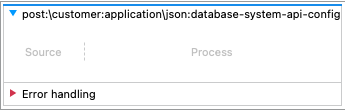
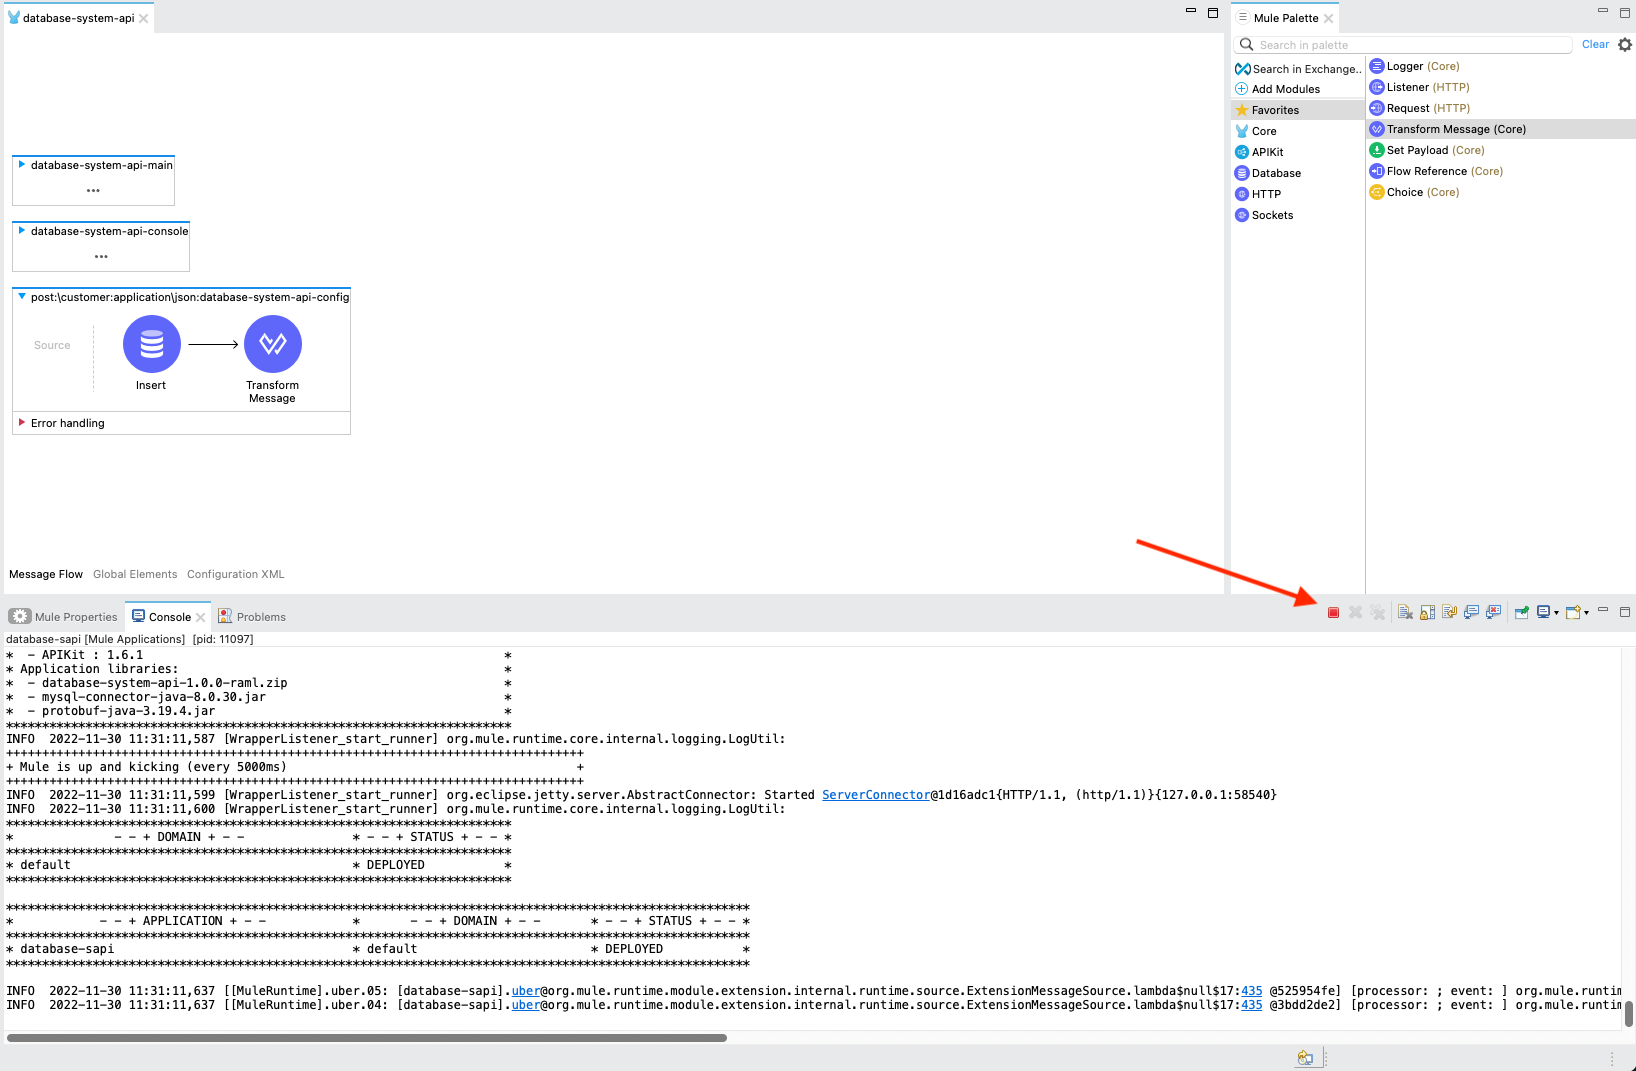
Navigate to the post:\customer:database-system-api-config flow. This flow will run when an HTTP POST request is sent to the /customer endpoint.
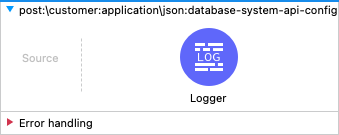
-
Remove the Logger step from the flow (right-click and Delete). Note: If you see a Transform Message component instead of the Logger component here, remove that instead. Your flow should now look like this:
-
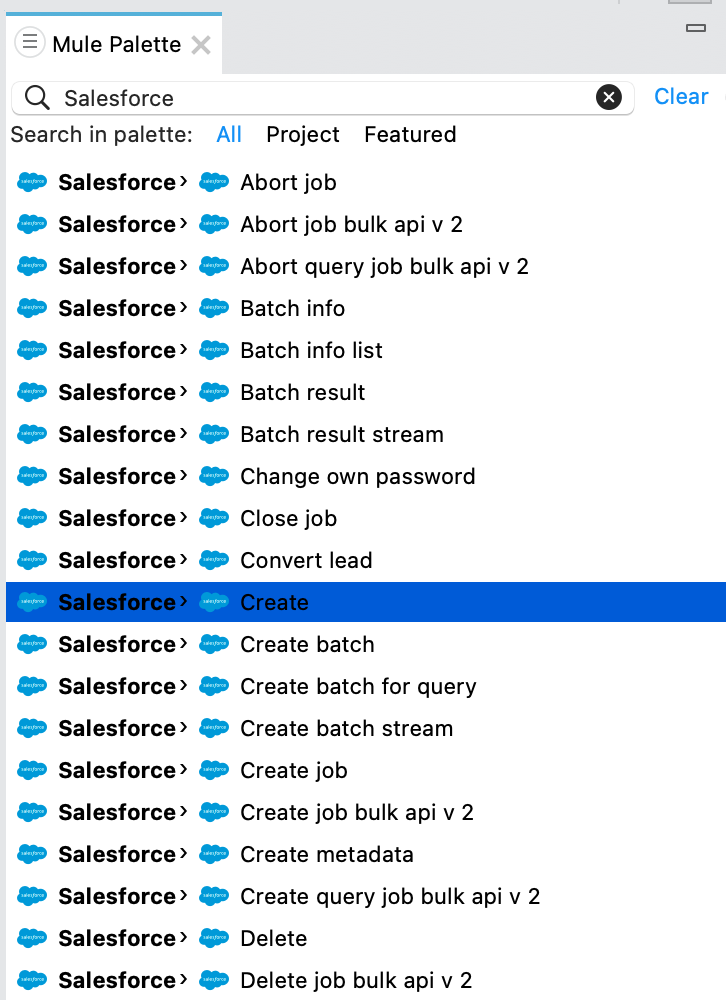
The first step to building this integration is to create a new record in an external source, in this case, Salesforce. On the right-hand side of your Anypoint Studio window, you should see the Mule Palette. In the search bar, search for Salesforce and scroll down until you find Create.
-
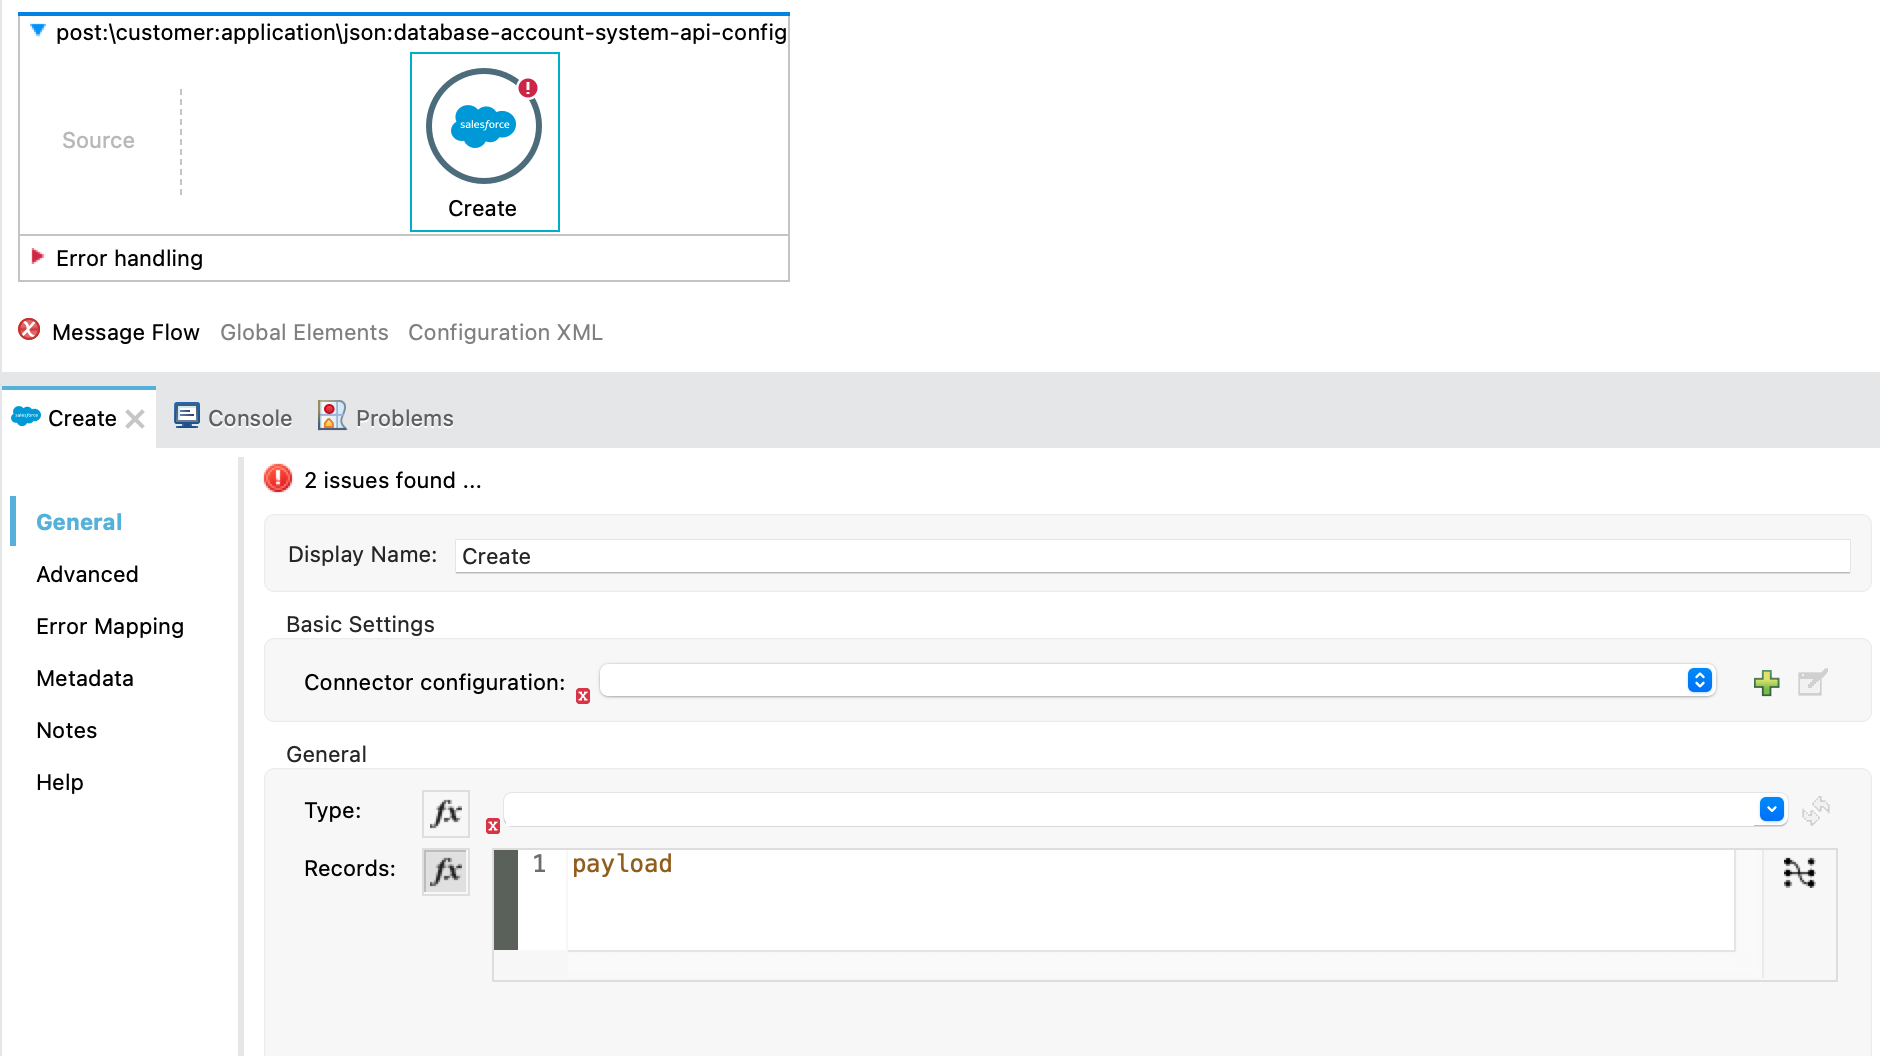
Click on the Salesforce Create connector in the post:\customer:database-system-api-config* flow. You should now see the connector properties appearing in the Message Flow tab at the bottom of the screen.
-
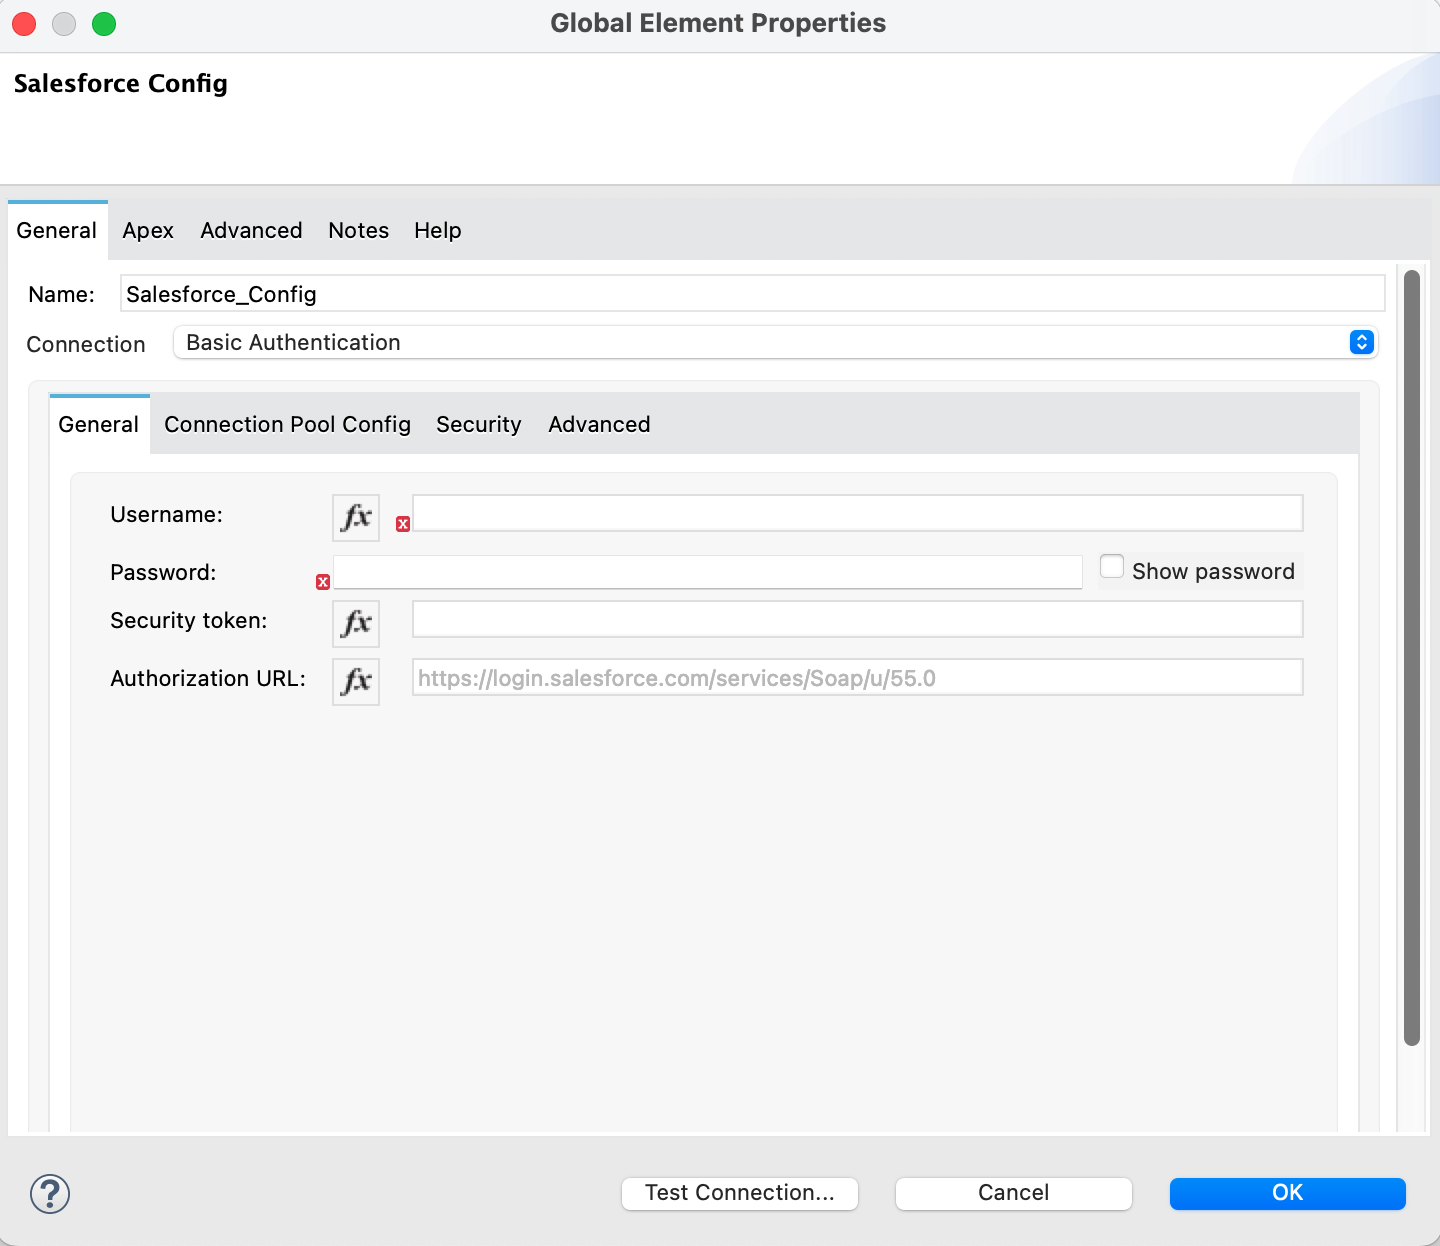
We will now set up the Salesforce connector configuration by clicking the green plus symbol.
-
Select Basic Authentication at the top Connection dropdown field. Then, enter the credentials, username, password and the users security token, to authenticate with your Salesforce Developer Edition Org.
-
Click on Test Connection button to verify that the connector is able to successfully connect to Salesforce.
-
Next, in the Type field, specify the Contact standard object.
-
Now add a Transform Message action from the Mule Palette by drag-and-drop, placing it right before the Transform Message.

-
In the window opened, drag the fields from left to the fields on the right for mapping. or alternatively add the following dataweave code to the editor window. Then click Done (top right corner).
%dw 2.0
output application/java
---
[{
	LastName: payload.lastName,
	FirstName: payload.firstName,
	Email: payload.email,
	Description: payload.company
}]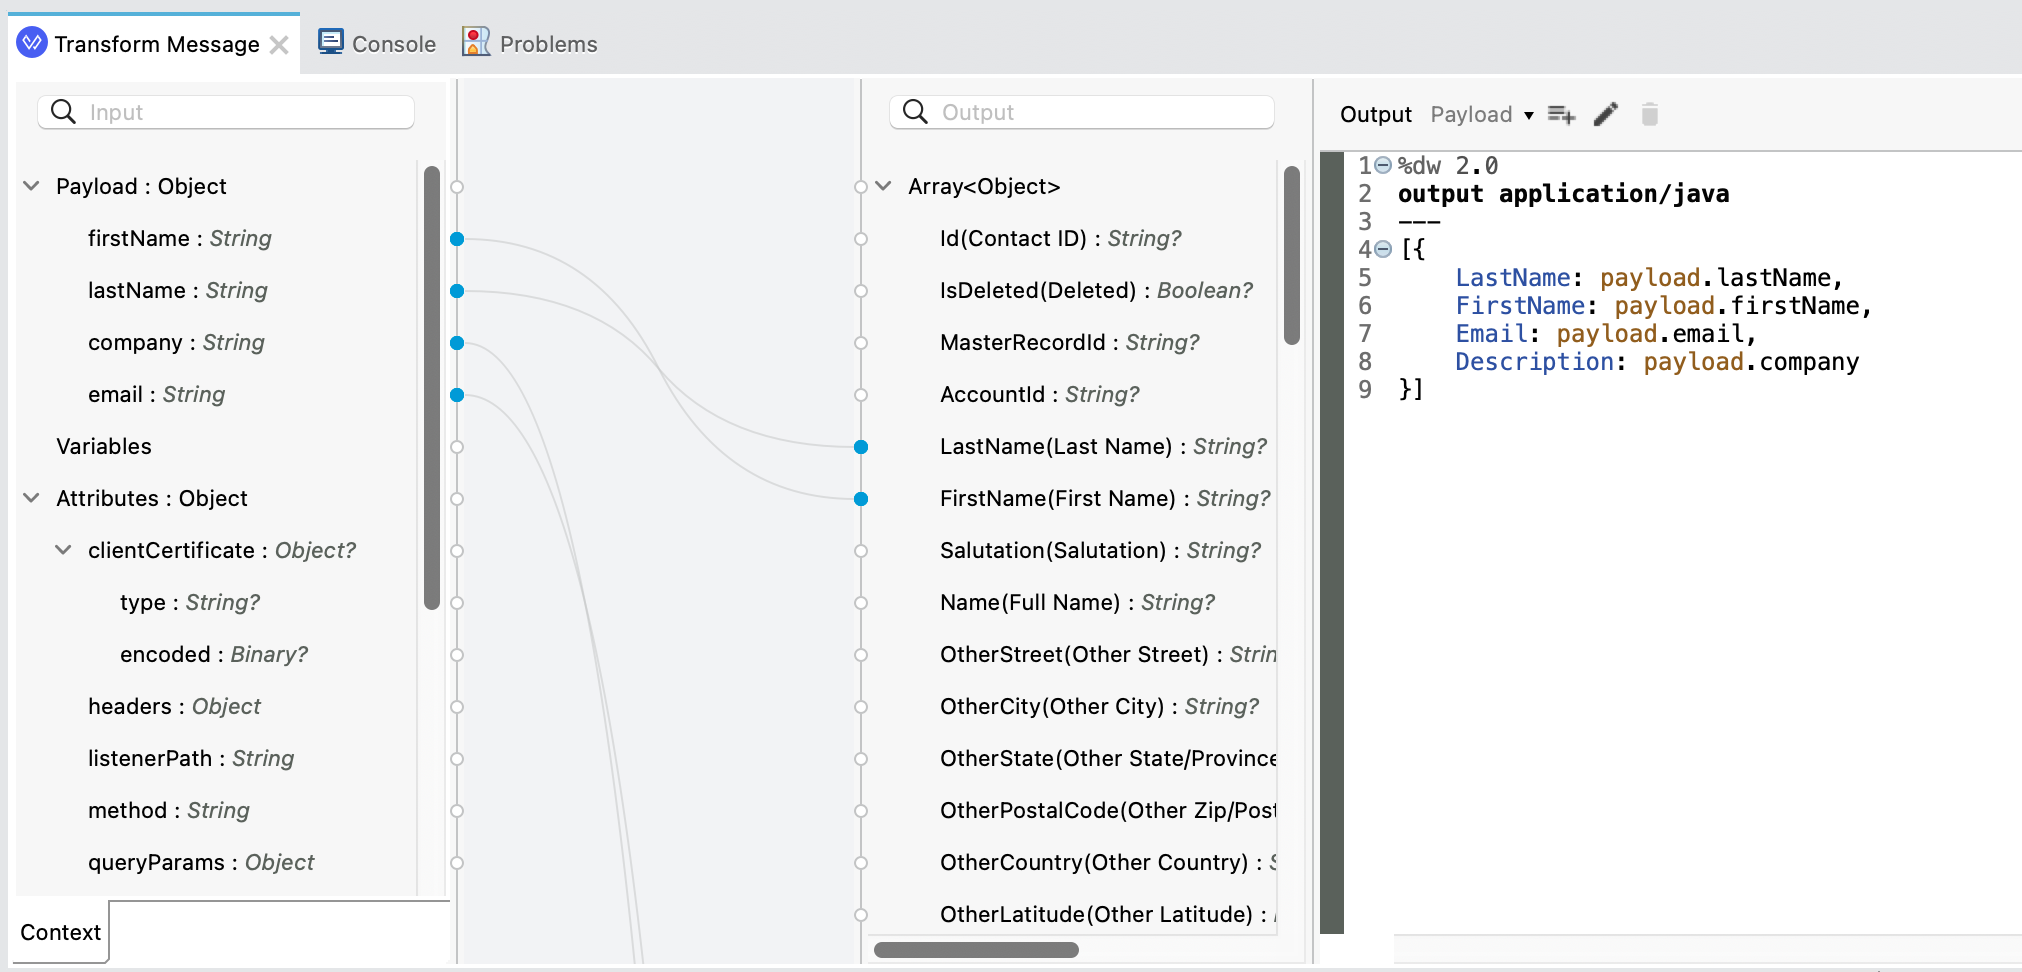
-
Drag a transform message and put it after the Salesforce Create.

-
Click on the Transform Message step in the flow. You should now see the component properties appearing in the Message Flow tab at the bottom of the screen.
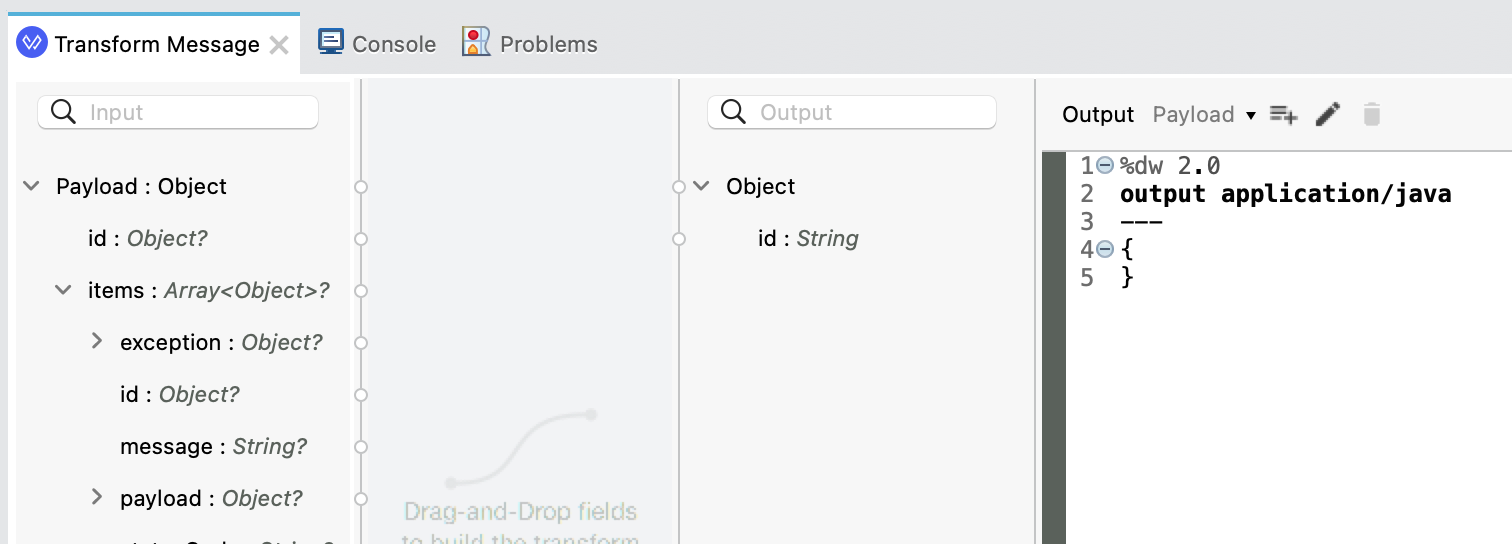
-
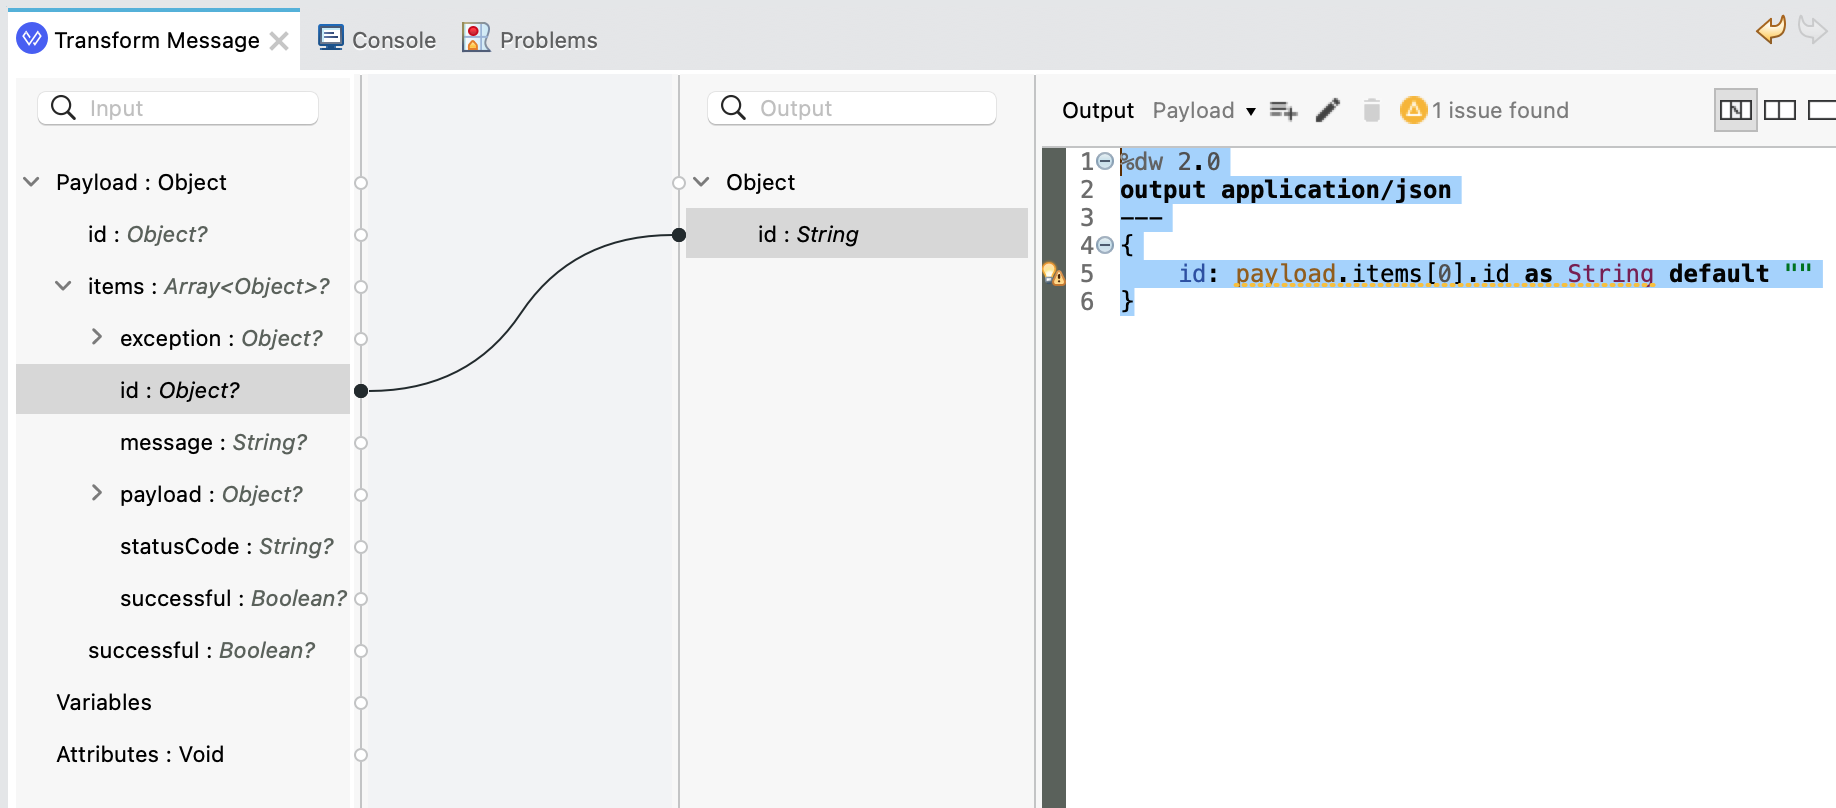
In the Output Payload on the right-hand side of the screen you can see the DataWeave code. Drag-and-drop the Payload field "id" (within "items") to the output "id", or replace the script with:
%dw 2.0
output application/json
---
{
	id: payload.items[0].id as String default ""
}
Step 4: Test the Post Customer Flow
We are now going to locally test our API and create the customer records in Salesforce.
-
Right-click anywhere in the project workspace and select Run project salesforce-sapi.
-
The Console window should open at the bottom of the screen and show you the progress of your application being compiled and initialized. When the application has been successfully deployed, the Console window should look something like the below:
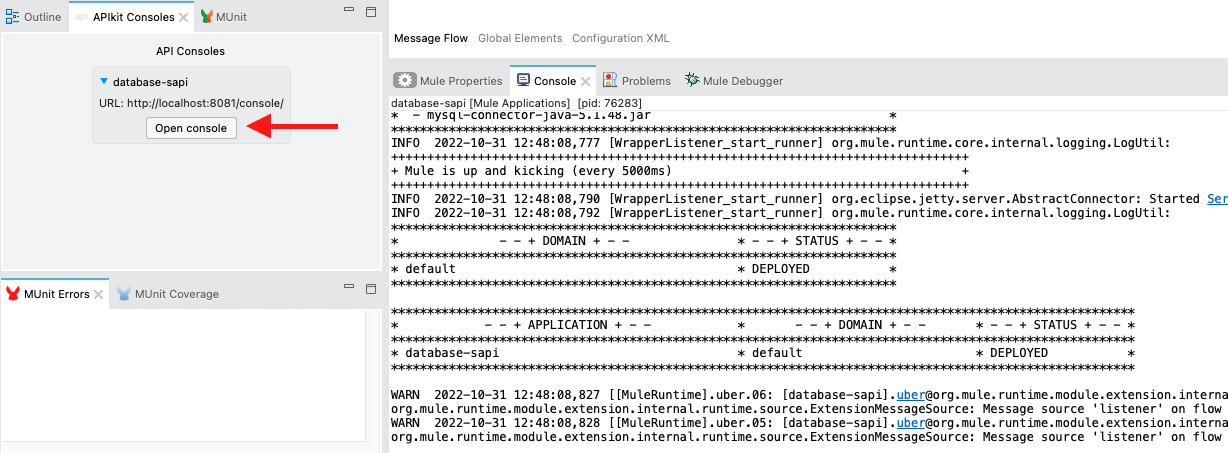
-
The API console provides the capability to locally test your API and should look very familiar as it provides the same capabilities you find in Anypoint Exchange.
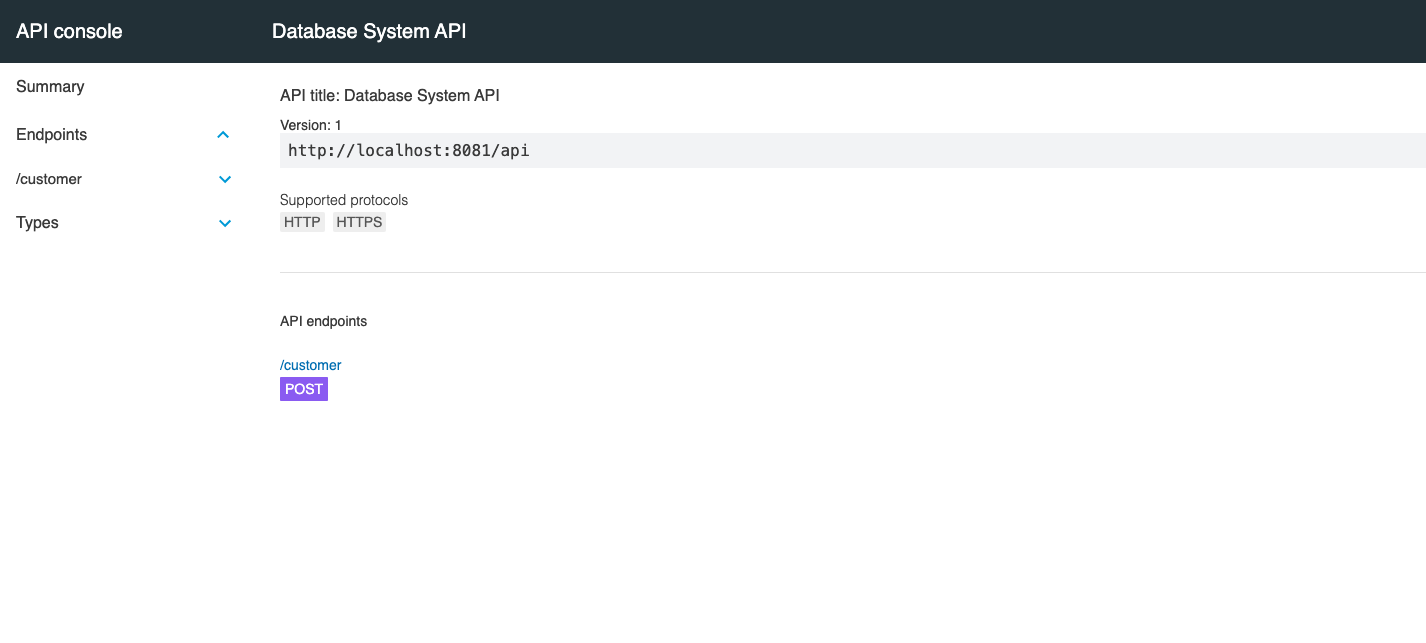
-
To test the API flow we have just built, click on the POST /customer endpoint.
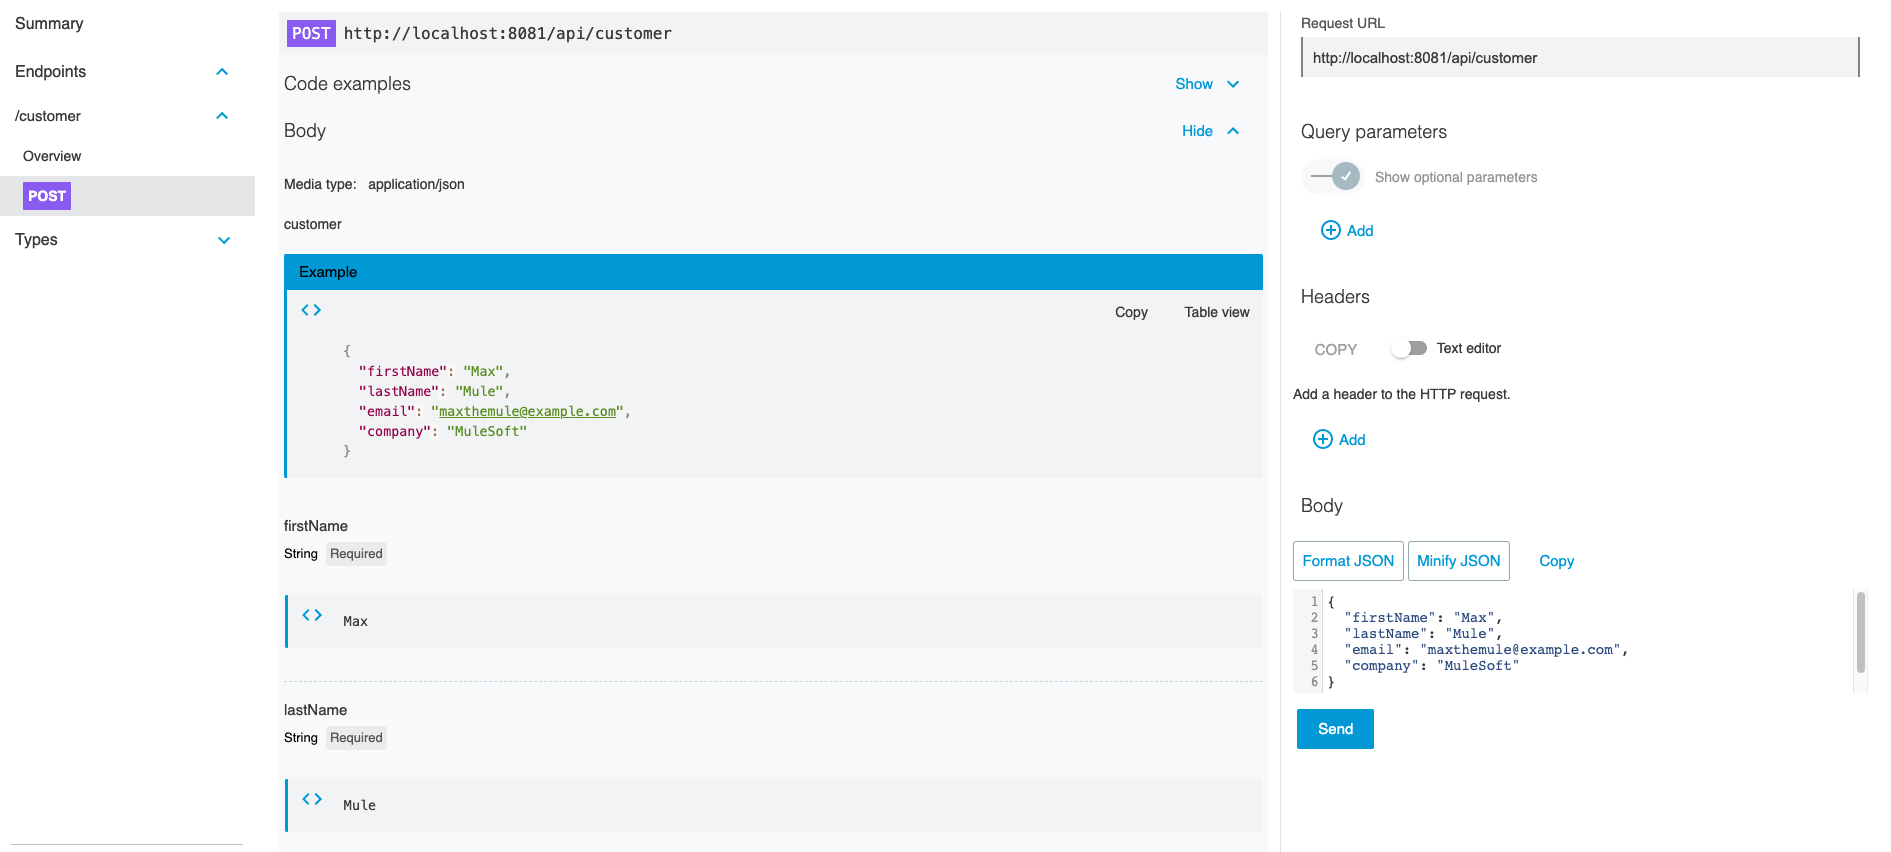
-
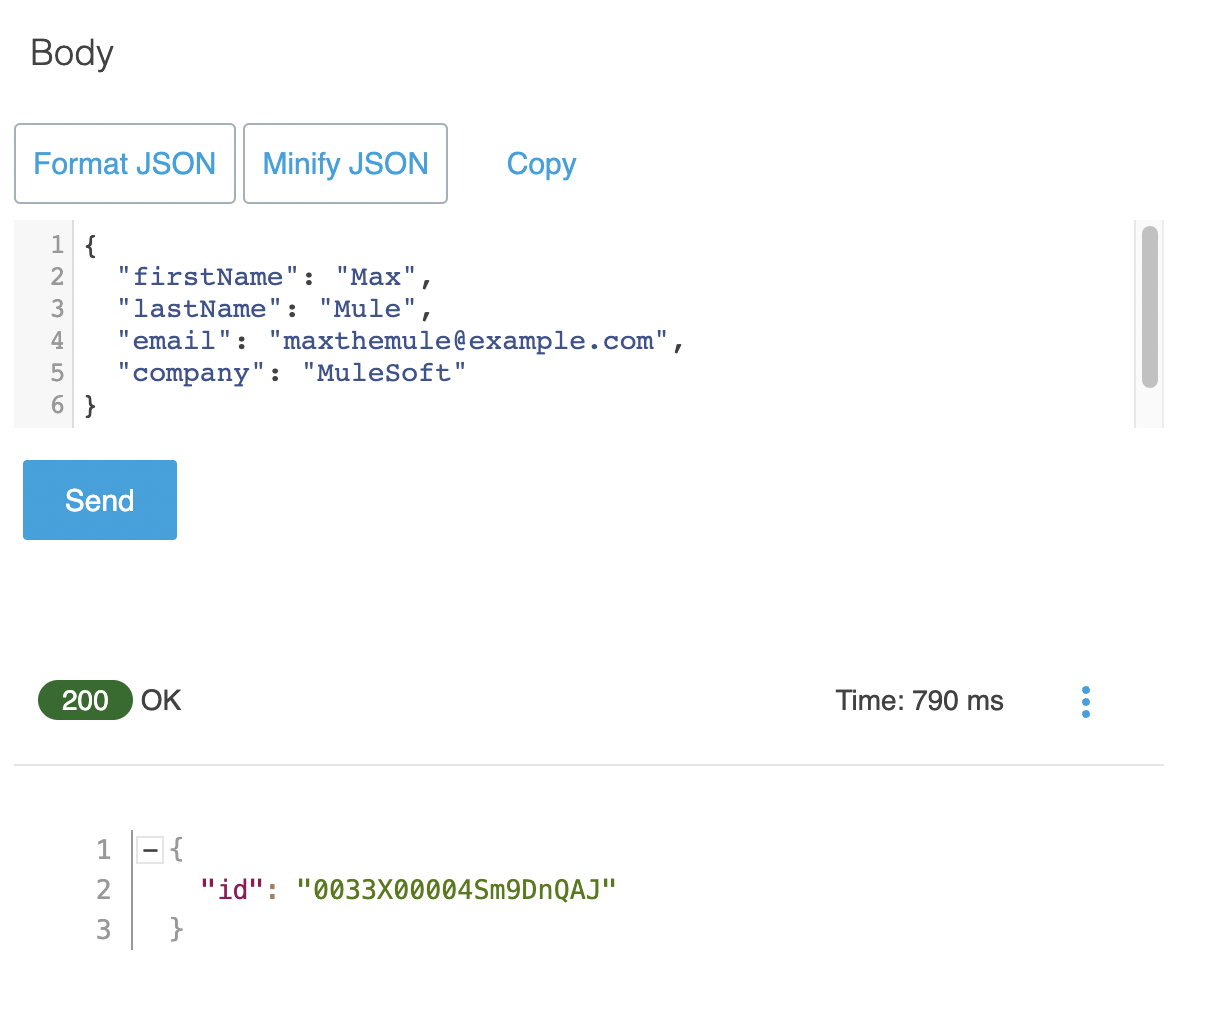
Click Send.
-
You should see a 200 OK response returned from the API call and this will also return the id of the newly created record.
-
Now that we have successfully tested our API, go back to Anypoint Studio and stop the running application by right-clicking anywhere in the project workspace and selecting Stop project salesforce-sapi.
Summary
In this lab, you completed the following steps:
We easily imported and built our first API.
In the next lab, we will deploy the Datatabse System API.
Please proceed to Module 2 - Lab 1